
この記事でわかること
RustでTIFFの読み込み方がわかります。
TIFF画像を操作するRustのライブラリ「tiff」
今回TIFF画像を読み込むために、「tiff」というライブラリを利用します。
「image」というライブラリもあり、TIFFだけでなく多くの画像フォーマットに対応しています。
こちらの方が人気のライブラリになりますが、「tiff」の方が64bitやmulti pageにも対応しており、TIFF単体の機能としては豊富です。
tiffの使い方
Tutorial形式で説明していきたいと思います。
1. まずはRustプロジェクトを作成
cargo new tiff_example
cd tiff_example
今回は、「tiff_example」というプロジェクト名で、Rustフォルダを作成しています。
また、フォルダー構成は下記の通りになります。
tiff_example
/Cargo.toml
/src/main.rs
2. 「tiff」ライブラリの追加
// Cargo.toml
[dependencies]
tiff = { version = " 0.8.1"}
Cargo.tomlの dependenciesにtiffを追加します。(バージョンは適宜変更してください。)
これで、ソースコードからtiffのAPIを呼び出すことできるようになりました。
Cargo.tomlでは、パッケージの情報やパッケージ内で利用するライブラリの管理を行います。
npmで言えば、package.jsonにあたる存在です。
3. TIFF画像を読み込んで、サイズの表示
まずは、画像を読み込んで、画像サイズを表示してみます。
利用する画像はこちら。

tiff_exampleの直下に画像はおきます。
では、src/main.rsに実装していきます。
まずは、ファイルの読み込みを行います。
// src/main.rs
use std::fs::File;

fn main() {
    let ifs = match File::open("sample.tiff") {
        Err(why) => panic!("couldn't open: {}", why),
        Ok(file) => file,
    };
}
これは、ファイルをbinaryで読んでいますが、TIFF画像として認識されていません。
また、openの戻り値が io::Result<File>なので、ErrとOk時のアクションを記述してあげる必要があります。
ここでは、エラーであれば異常終了し、OKであれば取得できたファイルハンドラーを返しています。
次に、TIFFのデコーダーで、先ほど読み込んだファイルをデコードしていきます。
これで、TIFF画像として扱うことができるようになりました。
// src/main.rs
use std::fs::File;

fn main() {
    let ifs = match File::open("sample.tiff") {
        Err(why) => panic!("couldn't open: {}", why),
        Ok(file) => file,
    };
/*****追加****/
    let mut tiff_decorder = match tiff::decoder::Decoder::new(ifs) {
        Err(why) => panic!("couldn't open: {}", why),
        Ok(decoder) => decoder,
    };
/*************/
}
さらに、dimensionsというAPIを利用して、サイズを取得します。
// src/main.rs
use std::fs::File;

fn main() {
    let ifs = match File::open("sample.tiff") {
        Err(why) => panic!("couldn't open: {}", why),
        Ok(file) => file,
    };
    let mut tiff_decorder = match tiff::decoder::Decoder::new(ifs) {
        Err(why) => panic!("couldn't open: {}", why),
        Ok(decoder) => decoder,
    };
/*****追加****/
    let (width, height) = tiff_decorder.dimensions().unwrap();
    println!("{},{}", width, height);
/*************/
}
正常に動作すれば、実行すると画像のサイズが表示されます。
cargo run
僕の環境では次のように表示されました。

期待通りの、960x1280(width x height)の情報が表示されましたね。
4. 画像の操作
一番オーソドックスな画素値のみを取り出すパターンです。
// src/main.rs
use std::fs::File;

fn main() {
    let ifs = match File::open("sample.tiff") {
        Err(why) => panic!("couldn't open: {}", why),
        Ok(file) => file,
    };
    let mut tiff_decorder = match tiff::decoder::Decoder::new(ifs) {
        Err(why) => panic!("couldn't open: {}", why),
        Ok(decoder) => decoder,
    };
    let (width, height) = tiff_decorder.dimensions().unwrap();
    println!("{},{}", width, height);
/*****追加****/
    let img = tiff_decorder.read_image().unwrap();

    let DecodingResult::U8(pixels) = img else { panic!("wrong byte"); };
/*************/
}
さらに、値を変更するパターンはこちら。
色を反転させてみました。
// src/main.rs
use std::fs::File;

use tiff::decoder::DecodingResult;

fn main() {
    let ifs = match File::open("P1000017.tiff") {
        Err(why) => panic!("couldn't open: {}", why),
        Ok(file) => file,
    };
    let mut tiff_decorder = match tiff::decoder::Decoder::new(ifs) {
        Err(why) => panic!("couldn't open: {}", why),
        Ok(decoder) => decoder,
    };
    let (width, height) = tiff_decorder.dimensions().unwrap();
    println!("{},{}", width, height);

    let img = tiff_decorder.read_image().unwrap();
/*****変更****/
    let pixels: Vec = if let DecodingResult::U8(pixels) = img {
        let mut output_pixels = pixels.clone();
        for (index, pixel) in pixels.iter().enumerate() {
            if index % 4 == 3 {
                continue;
            }
            output_pixels[index] = 255 - pixel;
        }
        output_pixels
    } else {
        panic!("wrong byte");
    };
/*************/
}
上のコードを簡単に説明しますと、
if let DecodingResult::U8(pixels) = img {
まず、ここで、画素値を取り出しています。
let mut output_pixels = pixels.clone();
で、画像操作後の値を入れる変数を生成。
そして、下記コードで、画像の色を反転させています。
        for (index, pixel) in pixels.iter().enumerate() {
            if index % 4 == 3 {
                continue;
            }
            output_pixels[index] = 255 - pixel;
        }
4. TIFF画像の保存
output.tiffという名前で画像を保存します。
// src/main.rs
use std::fs::File;
use tiff::decoder::DecodingResult;
fn main() {
    let ifs = match File::open("P1000017.tiff") {
        Err(why) => panic!("couldn't open: {}", why),
        Ok(file) => file,
    };
    let mut tiff_decorder = match tiff::decoder::Decoder::new(ifs) {
        Err(why) => panic!("couldn't open: {}", why),
        Ok(decoder) => decoder,
    };
    let (width, height) = tiff_decorder.dimensions().unwrap();
    println!("{},{}", width, height);
    let img = tiff_decorder.read_image().unwrap();
    let pixels: Vec = if let DecodingResult::U8(pixels) = img {
        let mut output_pixels = pixels.clone();
        for (index, pixel) in pixels.iter().enumerate() {
            if index % 4 == 3 {
                continue;
            }
            output_pixels[index] = 255 - pixel;
        }
        output_pixels
    } else {
        panic!("wrong byte");
    };
/*****追加****/
    let mut file = File::create("output.tiff").unwrap();
    let mut tiff = tiff::encoder::TiffEncoder::new(&mut file).unwrap();
    tiff.write_image::(width, height, &pixels);
/*************/
}
let mut file = File::create("output.tiff").unwrap();
で、保存するファイル名を決めて、ファイルハンドラーを生成します。
let mut tiff = tiff::encoder::TiffEncoder::new(&mut file).unwrap();
で、ファイルハンドラーとTIFFハンドラーを紐付けます。
最後に、書き出しを行います。
tiff.write_image::(width, height, &pixels);
出力された画像は、このような画像になりました。
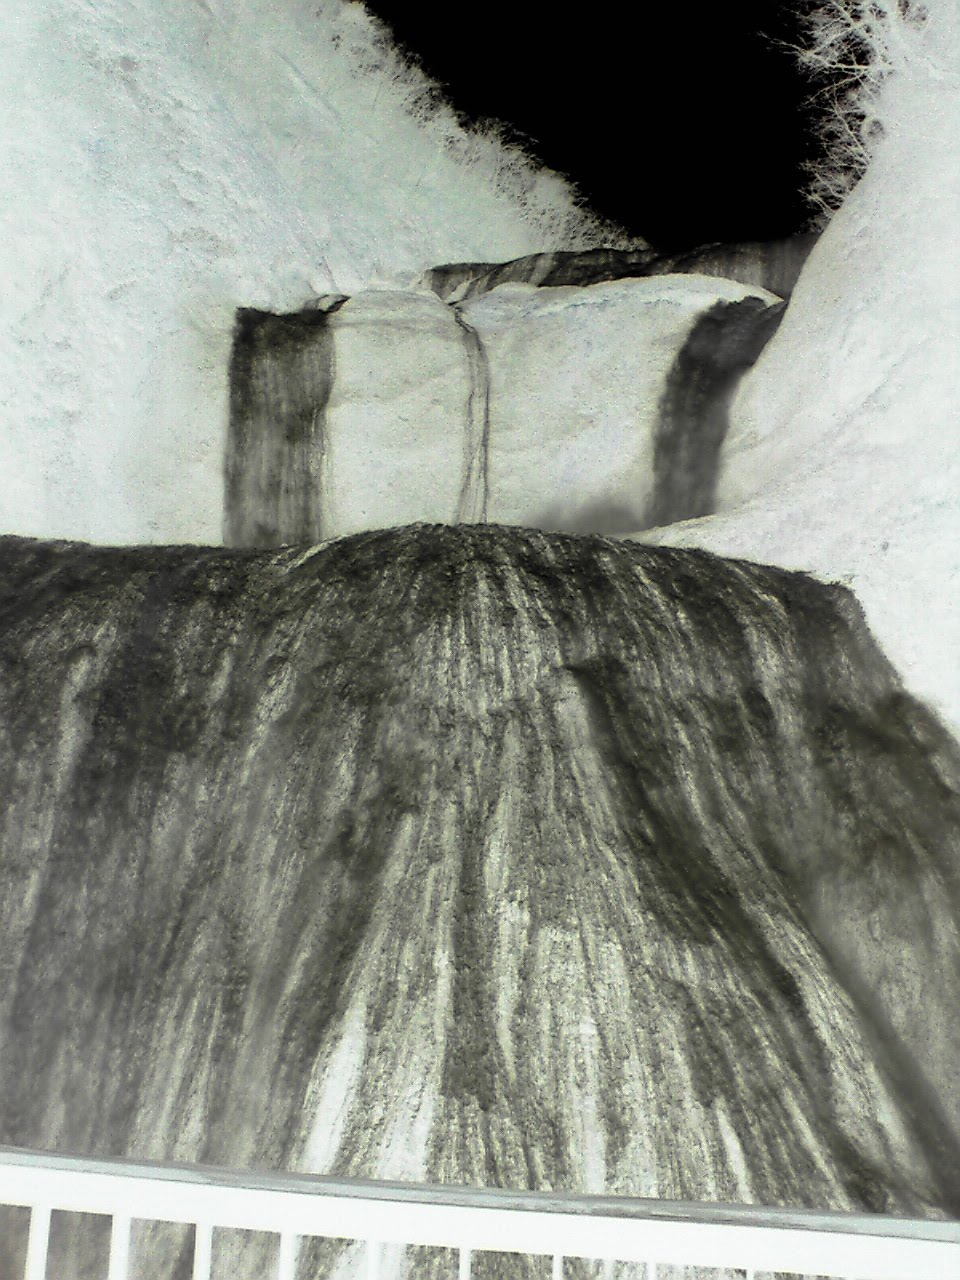
ちゃんと色が反転されましたね。
サンプルプロジェクトはこちら。
終わりに
今回はRustでのTIFFの読み書きを学びました。
「tiff」というライブラリを利用しましたが、8bitの画像だけを扱うのであれば「image」の方が扱いが楽かもしれませんね。
(tiffの方は扱い方が特に載っていなかったので、利用するまでに苦戦しました。僕はテストコードを見て、学んだのですが、利用者も多いみたいなので、どこかでチュートリアル的なのがあるんですかね、、、)